How a pastel drawing turns into a 3D scene on your phone

To return to the main page click here.
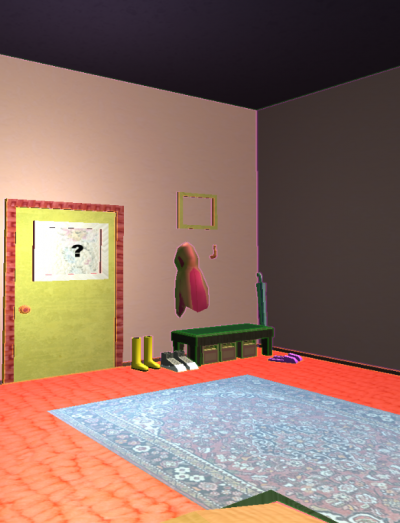
While this is the result:

The parts that make it happen can be broken down into three general parts.
The 3D model, code and marker.
Creation of the 3D Models
For the 3D models I used the free, open source project Blender (1). In this program I built the scenes by modifying the simple cube component into whatever shape I wanted, making one component piece after the other.
All of the models and drawings are based on photographs from the archive pieces I worked with.
I recorded the 3D modelling process of the Shabbat table scene(2) and uploaded it to my Youtube channel (3).

Once the model is built it can be textured, aka given colors and patterns. I used the internal texturing function of blender this time, usually I use Photoshop or a similar drawing program for this task.

Once everything is done being modelled, textured and adjusted in proportions and composition, it becomes time to work on the code.
Coding AR
I used two primary resources for the AR experience I ended up making.
Ar.js and A-Frame: https://aframe.io/blog/arjs/ (4)
These javascript resources are what allow the magic to happen that you see on your phone. All that was left for me to do was write .html code that enables them to work.
I will include a screen capture here of the code I used to make two of the scenes work. Please keep in mind that this is code that works 02.07.2019 and it may not work by the time you try to replicate it.

I had very little experience with html coding and absolutely none with JS, so naturally it took a while for my code to work.
What happens is that I call multiple .js scripts and then call the 3D models saved to github that I want to have appear. Finally I tell them how to appear when specific markers are detected by the camera and how to behave then. This leads us to the final part…
Markers – The Physical Part on the Wall
What is a marker, first of all?
The AR program does not react to the drawings themselves, it reacts to the little black box beneath them. This box is called a marker and this is how AR.js specifically works. Other programs, like for example the popular Vuforia used for mobile app development, can have more complex markers (for example the drawings themselves) too. AR.js is much more limited in that regard.
In general, AR either will run on markers or location. The popular Pokemon Go is an example of location based AR while this is a marker based one.
Since I did not just want to slap a black square on the wall but rather the illusion of the drawings creating a 3D scene where the viewer can see how they might have been used once, I decided to put the markers beneath them on the wall. When you point the camera at the drawing and have the marker still within the view, it becomes the scene you see on your screen properly.
But for that illusion to work, I still needed the drawings.

When it all comes together you get augmented reality.
Links: